How do you paint your own photography backdrop? I love the fine art backdrops that are available to buy. However, currently, I am not in the position to be spending out, whilst my studio is closed due to the Coronavirus. So, with all this time on my hands, I have been creative in other ways, and have started making props for my business, including painting a photography backdrop.
There are a lot of resources on the internet, that give you advice on the topic of how to paint a photography backdrop, so, before I began, I read these and watched any tutorials that were available. Sue Bryce has a great video on her educational site, and recently, Kelly Brown has done a tutorial. With all this advice, it was time to pay B&Q a visit!
ITEMS NEEDED TO PAINT A PHOTOGRAPHY BACKDROP
DUST SHEET/CANVAS
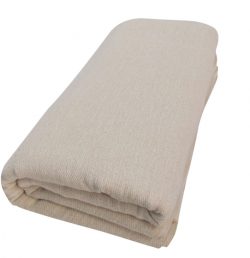
Ideally, I would love to have purchased a artist primed canvas, which Kelly Brown discusses in her video. However, not only was I being impatient, as this would take a few weeks to arrive, I wanted to try and create a photography backdrop on a budget. Hence, I decided to use Sue Bryce’s method and buy a canvas drop cloth or what is a canvas dust sheet.
These Canvas dust sheets come in a range of sizes, but the aim is to get the thickest quality possible. Ideally around 12oz. I ended up purchasing the Medium Reusable Dust sheet, (L)3.67m (W)2.74m for £14
PLASTIC DUST SHEET
Unless you don’t mind the area you are painting the backdrop to get messy and covered in paint, I would advise you get a plastic dust sheet. As I was going to be painting on my lawn, I decided to use a plastic sheet to protect the grass. However, in hindsight, if you have a patio area or large enough space in your garage, it would be easier to paint on a hard surface.
I purchased a cheap plastic dust sheet from B&Q.
GOOD QUALITY STRONG DUCT TAPE
To help yourself whilst painting the backdrop, you need to make sure the canvas is secure and does not move around. I used strong duct tape to secure the canvas to the plastic sheeting. You can purchase this from any DIY shop.
PAINT
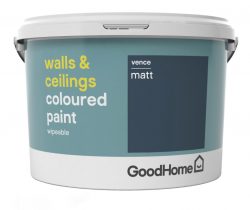
The key when choosing your paint, is to make sure you have a MATT finish. You do not need to use chalk paint or even acrylic paint which is something I had heard, but, for my backdrop, I went for regular matt wall paint from B&Q. I also decided to use their own brand which was a cheaper alternative. Choosing the colours was probably the thing I spent most of my time thinking about, but in the end, I decided I wanted to go for a Bluey/Grey look to my backdrop, so brought a blue and a black paint.
The particular blue paint I got was GoodHome Walls & ceilings Vence Matt Emulsion paint, for £12 2.5L
PAINT BRUSH OR PAINT ROLLERS
As the canvas I was going to paint was rather large in size, I decided for ease and quickness to use a paint roller. Make sure you have an extendable roller pole to help you reach the middle parts of the canvas
PRIMER – GESSO OR PVC GLUE
Unless your canvas has been primed, you will need to do this before you begin painting. You can paint without priming, however, the paint will just soak through and will not hold the paint as well. I ordered a pot of gesso from Amazon, which I used for the first prime coat. For the second coat, as I didn’t have any Gesso left over and I had no PVC glue, I used Mod Podge glue which I had left over from a crafting project. Ideally, if you are not using Gesso, I would get PVC glue as it is cheaper, but with the hassle of trying to get the correct glue because of the lockdown restrictions, I decided to go with what I had.
HOW TO PAINT A PHOTOGRAPHY BACKDROP
So, now having got all the items I needed, the fun part began. Unless you have a huge garage you can use, if you are doing the painting outside, I would suggest waiting until you have a nice sunny day, as, it takes a while for the canvas to dry.
STEP ONE – GET YOUR CANVAS SECURED AND READY TO PAINT
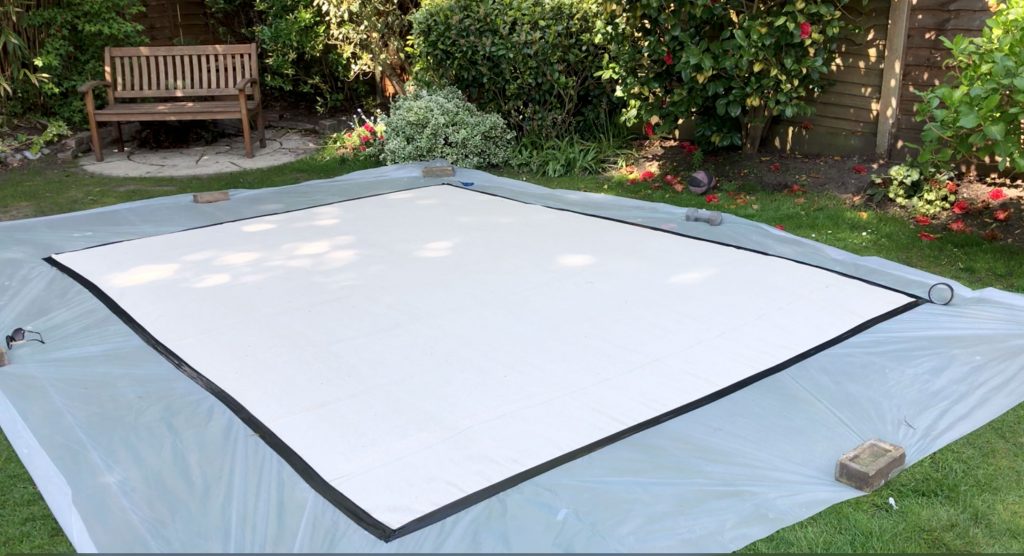
Lay out your plastic dust sheet and secure the canvas on top with the duct tape. Try and pull the canvas as tight as possible and remove any creases, as this will make it harder to paint and leave an uneven paint finish.
STEP TWO – PREPARE THE PRIMER AND COAT THE CANVAS
For the first coat, I primed the canvas using Gesso. Using a large tub, I mixed the tub of Gesso with water (ratio of approx 75% water and 25% Gesso). The key is that the mixture is thin enough to paint on. You don’t want any blobs of glue coming through, so as you paint, it may be that you need to add more water as you get nearer the bottom of the mixture. You will know if its too thick as its impossible to paint on. I kept a watering can nearby, so I could add water to thin out whenever I needed.
Once the first coat had dried, for the second coat, as I had run out of Gesso, I used Mod Podge, but would suggest PVA glue which is cheaper. For this mixture, I mixed 75% water with 12.5% glue and 12.5% white matt paint. This is an approximate and doesn’t have to be exact. The key thing is the consistency of the mixture. It needs to be quite watery for you to paint on. Coat this mixture over your canvas and leave to dry. The above picture is how it looked after I had finished the second coat. I covered my canvas with tarpaulin overnight, as I didn’t have time to do all the painting.
STEP THREE – PAINTING THE CANVAS
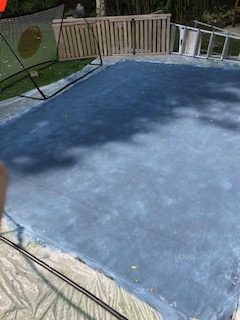
I did 3 coats of paint in total for the look I was going for. The first base coat, was purely the blue paint. I mixed it up with about 60% water/40% paint, however, as mentioned before, it does not have to be exact. I would advise it to be more watery than anything as if it does get too thick its hard for you to paint on and it leaves big patches of thicker paint. The first coat of paint will look patchy, but don’t worry. Try when painting to get into all the little creases. Some parts of the canvas were more stubborn than others, so changing directions of the roller often helped. The parts of the canvas where you can see darker patches are where the paint got too thick and made it difficult to evenly put on. Add a little bit of water on its own to the canvas to help smooth these out. Another thing I didn’t do was cut my canvas to start. If you have a specific size canvas that you want, make sure you cut down to size at the beginning so you are not wasting paint!!!
Painting with a roller – I had just run out of paint mix at this stage, but here you can see the different strokes used to make up the backdrop
First coat of paint
With it being a sunny day, it didn’t take long for the first coat to dry. It doesn’t have to be totally dry. For the second coat, as the canvas was too blue and I wanted a bluey grey look, I added black to the blue paint. Like before, always make sure you are working around 75% water to paint. Its more of a wash effect each time you paint a layer. With this layer, I washed the paint over in all different angles so it wouldn’t have such a smooth finish. A piece of advice worth noting, is that I wish I had made up enough paint per layer for the whole canvas. Its very hard when you run out of your paint mix, to mix it up identically like before. When this layer had dried, I realised that one end was a lot darker than the other because of this problem.
In some cases, you may not need a third coat, however, as I had a large area that was much darker than the rest, I used the 3rd coat to even out the colourings. I worked on painting the lighter area so it matched the darker piece. I made sure I painted the roller in all directions to get a textured feel to the canvas.
Final coat of paint before I left it to dry
STEP FOUR – HANG YOU CANVAS & START USING!!
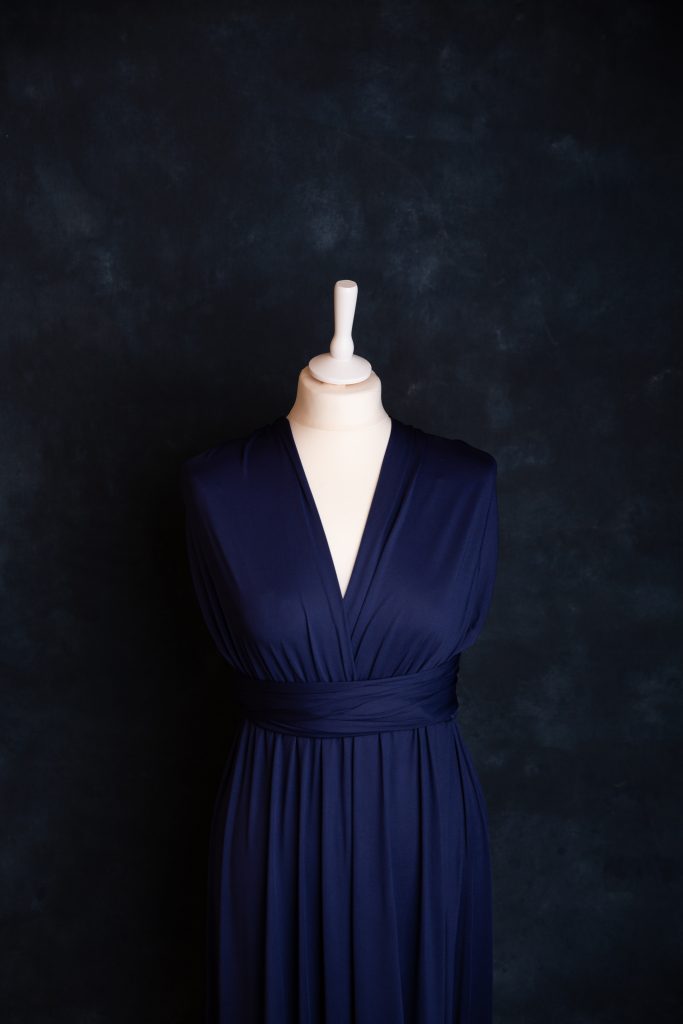
I decided to put my canvas on a roll which I had left over from a previous paper backdrop. Here is a test shot of the final backdrop!
FINAL TIPS
Something I learnt afterwards, was to put some fabric conditioner in with the paint. This helps keep the canvas soft.
Cut your canvas to the size you want before you begin painting!
Paint your canvas on a hard surface
Choose a sunny day to paint your canvas as each step takes a while and you need a good day to help it dry quicker
Have fun!